Showing posts with label General Sewing. Show all posts

Thursday, February 12, 2015

American Girl Doll Rehab and Clothing

My dear Sister-in-law got me an American Girl doll for Christmas so that I could use her to measure and model the AG-sized items I will be selling in my soon-to-be Etsy shop. 


She came to me totally naked, being a previously well-loved doll that my SIL got for a deal. 

Fortunately, my SIL knows a thing or two about rehabbing tired old dolls. 

She went from this...


To this!

 Well, obviously I had to get some clothes on her quickly. I had a pair of old grey knit pants that my boys had outgrown lying around, so I turned them into a pair of leggings.  You can see the wear on the hem seam, where the thread had started coming out.  Oh well, it was faster and easier to make them with the original hem, and I don't think she minds.

Then I started making a dress for her, but soon thought that if she is going to be modeling other things, she should wear something plain and simple so she won't clash with the patterns on the other items. In the end I went with a simple white t-shirt instead.

Of course, I can't keep it simple, and I can't follow a pattern.  I always have to add something, or modify the method.  I did both on this shirt. 


The shirt pattern I used was originally a tank top.  I added the sleeves and the ruffle around the neck, which is just a 1-inch wide strip of fabric, ruffled up the center and sewn on.

I also modified the method for back closure.  It took me awhile, actually, to figure out the best way to close it up.  I unpicked quite a bit, but in the end I am happy with how it turned out.


All in all, I think she has made a lovely transformation! 

Friday, April 11, 2014

Charity Sewing - Infant Layette Shirt

There is a charity organization located in the next town over from me here in Maryland called IMA World Health.  A month or two ago they contacted our Relief Society President at church and asked if we would help provide layette shirts and gowns for their "Safe Motherhood Kits".  To quote from their site, these kits "provide clean and sterile birthing supplies to expectant mothers in areas where infant and maternal mortality rates are among the highest in the world."


Of course, I jumped right on board with this project!  First of all, I try to take any opportunity to serve others with my talents, but also, as a mother of severely premature NICU twins, I have been on the receiving end of  many others service in the form of handmade and crocheted blankets, layettes, even hand-sewn Christmas stockings for my babies while they spent their first Christmas in the hospital.  


When you are in that situation, it is very overwhelming to know that there are so many people out there willing to spend their time and talents to help serve and comfort those in need.  I vowed then that I would do what I could to try to give back to others in a similar way, especially when it comes to babies in need.

The little football player bear shirts were the first ones I made (only one is pictured).  I wanted to hurry and get one made to use as an example for the ladies at church.  I don't have a ton of baby-type fabric in my stash, but did find this old piece that has been hanging around for about 4-5 years now and was able to get two shirts out of it.  

For the rest of the shirts, I tried to go a little more gender neutral, since these will be going to a variety of babies.


While their website has suggested guidelines for the shirts and gowns, it didn't have an actual pattern.  I looked online for something similar, but didn't find exactly what I was looking for. So, to make things easier I offered to draft a pattern for anyone who wanted to help make them. It is a mash-up of the website's  guidelines, 2 other patterns/guidelines I had, plus my own alterations.  

I sewed the first one with french seams, as the website suggests. The enclosed seams are definitely nice for concealing the raw end of the inner tie, but my biggest complaint was that it made the shirt smaller than I wanted.  I wanted them to be fairly roomy, since they will be going on a variety of sized newborns.  So after that, I took to my serger, which neatly enclosed the tie ends into the seams as well as giving it a nice, finished look. It is definitely the way I would suggest finishing these shirts. 

I used both regular cotton fabric as well as flannel.  Both worked great for the bodies of the shirts, but I suggest only using the thinner cotton fabric for making the bias tape ties.  The brown polka dot ties are adorable, but made from flannel, and they didn't want to play nice. 

 Now, If anyone would like to make a layette or two to DONATE to our cause (wink, wink), I would gladly accept any sent to me before the May 1st due date. I can email the pattern. It's hand drawn and not professional in the least, but it works.  (At this point, it is JUST the pattern, not written instructions.  I have been directing the people at church to the IMA website to follow their general guidelines for construction. However, if I had enough people interested, I would write up some instructions to go with it.) 


My email address is: krysllyn@gmail.com
If you want to send a shirt to donate, email me for my mailing address. 


Linking Up:
Fabric Frenzy Friday @ Fort Worth Fabric Studio


Monday, March 31, 2014

Another 241 Tote

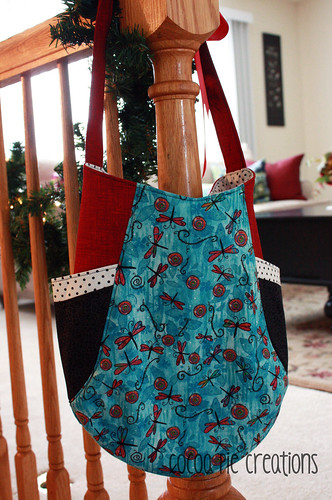
241 Tote for mom

After she saw the 241 Tote I made for myself last summer, my mom decided she wanted one, too.  I told her I would make her one for Christmas, and she was fine with that.

However, then we found out we would be moving, and my mom was able to come out for a week to help me pack.  Since she was in town, I thought it would be fun to take her to the LQS and let her pick her own fabric.

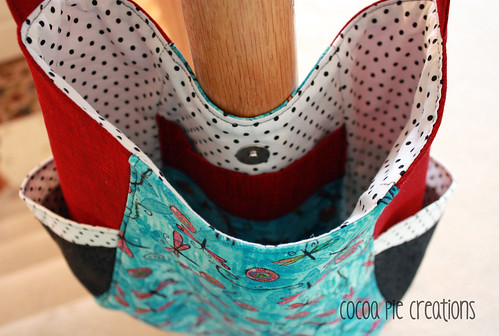
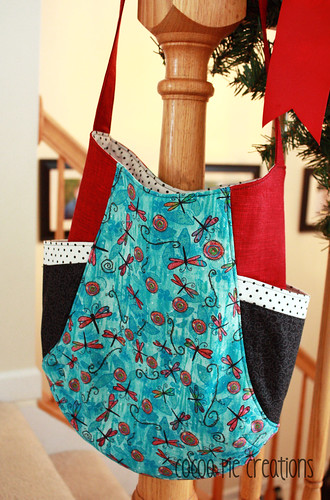
My mom is not a sewer, so she wasn't sure initially what to pick.  I told her to just start with a focus fabric...something that jumped out at her and that she loved.  She decided she wanted something whimsical, and these butterflies fit the bill.  After she picked the butterflies, it was pretty easy to help her find coordinates that she liked.  The only thing she didn't pick out was the lining.  She didn't like anything at the store that day, so I ended up finding this Moda basic dot fabric online a little later.  I think it turned out perfectly!

241 Tote for mom - interior

241 Tote for mom

Thursday, October 31, 2013

Happy Halloween!

**For last year's post on previous costumes I have made, go (HERE)**

***

This year, only one of my boys wanted me to make his costume.  Which is nice in that I don't get totally burned out on costumes by the time Halloween rolls around and it is actually time to wear them!  


Boys 2013


My son decided to go classic this year and be a ghost.  I paid .99 for a basic Simplicity kids costume pattern for the robe and hood, but as usual, didn't bother to follow the instructions for assembly at all. Haha! 

I made it out of bleached muslin and some Halloween "fabric" cheesecloth that I got dirt cheap during a big sale at Joann's.  So, all in all, it was a fast, cheap and easy job...and I LOVE it!  I think it turned out great.  


Ghost Ashe


My son loved it too, and literally looked like a spooky white spectre floating through the parking lot of our church's Trunk-or-Treat.  He rocked that ghost costume!  Which, of course, makes every effort of making homemade Halloween costumes worth every stitch.

Happy Halloween!!

Wednesday, October 30, 2013

All Moved and a Diaper Bag

I realize it has been over two months since posting, but with the move (which happened September 1), my husband deploying two weeks later, and two weeks of traveling and visiting family a week after that, I really feel like I have just gotten here and finally have things in place enough to sit down and post something!

I have actually done quite a bit of sewing since I have been here (one of the "perks" of my husband being gone - lots of alone time in the evening to fill with sewing, I guess!) and I will be posting about them soon, but I will start with a little baby doll diaper bag I made for my nieces birthday (pretty much following  THIS tutorial, except I added side pockets to hold doll bottles, etc.)

The crazy thing is, when she opened the gift she said, "It's a diaper bag!"  Neither her mom nor I could believe that she knew exactly what kind of bag it was without being told. Kind of awesome.  

Apparently, it was just what she needed. 

(Warning: crappy, uncropped phone pics ahead - that's what you get when you have only unpacked half your house and don't know where anything - like your camera - is!)


Wednesday, August 14, 2013

Sew Many Books - A Summer Sewing Series


 photo PicMonkeyCollage_zps8cc13f49.jpg

I'm excited to be a part of the summer sewing series, SEW MANY BOOKS, over at Nap Time Creations today!  Head on over to read my tutorial on how to turn an illustration from your child's favorite book into a wearable piece of clothing!


Extra bonus: you get to see a bunch of photos of my adorable twins! (Who, me biased??  Nah....)

And while you are there, don't forget to sign up for some fun giveaways. 

Monday, August 12, 2013

A Ghastly 241 Tote

I've been wanting to make myself a new bag for awhile.  I've been hauling around the same old diaper bag for almost 5 years now, even though at this point it is pretty empty with my youngest being almost three.  I just don't have the need to haul around a bunch of baby crap stuff anymore!

The problem is I have just been very indecisive about both the pattern and fabrics I wanted to use for a new bag.  I know it shouldn't be a big deal...it's not the first and not that last bag I will make, but I just couldn't seem to get inspired about it.  So I put it off, and put it off, and well, you know how it goes.

However, as I would do my random bag pattern searches, hoping to get a little inspiration, I kept coming back to the 241 Tote...you know, the one that is all over the internet made in every fabric possible?  Yeah, that one.  Let's be honest, it's just a darn cute bag!  So anyway, that was kindof in my mind when I walked into my LQS and saw the new line of "The Ghastlies" on the shelf.  

That was it.  I knew exactly what I wanted to do with that fabric.  And thus, my 241 Tote was born!


The Front:

A Ghastly 241 Tote - Back


The Back:

A Ghastly 241 Tote - Front

Honestly, I can't decide which side I like better!

And here is the interior.  The lining is another print from the "Ghastly" line called "ghastly clovers", I believe.  The other  fabrics are a matching Sketch (charcoal, maybe?) and a random  pink polka dot fat quarter they had in the store.  Truthfully, when I found that pink polka dot in the EXACT shade and tone as the cheeks of the characters, I knew it was meant to be.

A Ghastly 241 Tote - Interior


And I just love this "ghastly" little couple that peeks out at me from the pocket every time I look inside:

A Ghastly 241 Tote - pocket detail

I followed the pattern exactly EXCEPT that I lined the body of the bag with fusible fleece instead of the cotton woven interfacing (I still interfaced the handle and pockets with the cotton woven interfacing), and, as seen above, I made the pocket a little differently so that I could have the polka dot band showing on top.

I just love it!


Linking Up:

Friday, August 2, 2013

Cute Ruffle Butts and a Fun Summer Sewing Series!

This is a little project I finished a few weeks ago and am now just finding time to share:

bdiaper ruffle set

bdiaperrufflebib

 It is essentially the same as the Diaper & Bib sets I made for my nieces for Christmas last year, but with one adorable change...a ruffle butt!

bdiaper ruffle

I had thought about adding the ruffle to the Christmas sets just a little too late, so I knew when I made this one, I wanted to try it.  I think it turned out totally darling!

This set was made for my twins' good friend's little sister (say that five times fast!) for her birthday last month.  She just turned two, and I felt like this could be a gift that she could really grow into and use for years to come.

The only thing I didn't end up loving about this set was the little baby quilt, which was made entirely from flannel from my scrap box.  I used it to practice some FMQ on...and I definitely quilted it far too densely.  It ended up feeling like a place mat, rather than a baby doll quilt!  (I do, however, love the cute bird flannel backing!)

bdiaper ruffle quilt back


***

Something else I wanted to mention:

I'm participating in Nap-Time Creations Sew Many Books sewing series. This is a fun series of posts all about children's clothing inspired by children's books.  How fun is that??

Come back on August 12th to see my addition to this fun series.

Here's who else is joining in the fun this month:
 photo PicMonkeyCollage_zps8cc13f49.jpg

Be sure to stop by Nap-Time Creations on these days for some great giveaways
August 6th- $50 to fabric.com & free Personalized kids book from iseeme.com
August 13th- Pattern Pack from Peek-a-Boo Patterns 
August 20th- Pattern Pack from Coles Corner and Creations & A Remnant Surprise Book
if you are interested in sponsoring a giveaway or participating in NEXT years Sew Many Books series e-mail Emily at nap-timecreations{at}hotmail{dot}com

Friday, May 24, 2013

Teacher Gifts - 2013

(Click HERE to see last year's Teacher Appreciation gifts.)

***

Before I get into the details of these little totes, here is a little school-related story (Go ahead and skip ahead if you want to get straight to the totes!):

  This past school year was kindof drama for us.  I started the school year with a bad feeling in my gut about their school situation that just weighed on me and never left.  

Without going into boring detail about the reasons why, after the holidays I ended up pulling my twins out of that preschool and placing them in another one that is run by a wonderful lady from our church that I have known since I first moved here to Virginia.

Now, one of my twins has just caught on to everything so quickly and easily that he is pretty much reading and spelling at only 4 years old.  (I might be biased, but personally, I think he's pretty awesome.) 

My other twin (whom I also think is pretty awesome!) has been struggling.  Last year he had a superb teacher who kept him right up with the rest of the class.  That is maybe why I didn't notice him struggling until this past school year started.  He (and I) was getting pretty frustrated at his lack of progress, and I just felt he was being quickly left behind.  

The difference I have seen in him in the last three months since we made the switch has been amazing.  His writing and spelling have blossomed.  I know it is the difference between a teacher who truly loves him and cares, and one who may not have cared as much.  

I am SO happy I listened to that little voice in my head and heart that told me to move my boys.

***

So...even though I felt like these new teacher deserved something totally amazing for a teacher appreciation gift this year, time just wasn't on my side (their new school gets out almost a whole month before their old one did, so in my mind I thought I still had more time than I really did).  But these amazing ladies will be my twins teachers again next year for their last year of preschool, so I have a whole year to think of and make something amazing for them next year.

This year, these darling little mini totes (filled with chocolate!) will have to do :)
  

mini totes - teacher appreciation gift

I dug through my scraps and found these apple prints (Apple of my Eye by Riley Blake) which I thought perfectly appropriate, and followed this amazingly simple mini tote tutorial (by Monica Solorio-Snow) to make these adorable little treat bags for my twins teachers.


mini totes interior
interior view
They were so fast and easy, I can definitely see making a lot more of these in the future for all kinds of little gifts and favors.


mini totes size
This gives an idea of the size next to a quarter.  These came out to be about 4.5 x 4.5 inches.

Following the pattern, I would say these took about 15 - 20 minutes from start to finish.  You could, of course, take a little more time if you chose to quilt the bags, or add topstitching, or make fabric handles.

However, I really do think they are darling just the way they are.
  
 Linking up here:

Tuesday, February 5, 2013

Warming Neck/Shoulder Rice Bag

One of my best friends started working full-time again recently.  Apparently, the transition has not been nice for her neck and shoulders because a few weeks ago she asked if I could make her a warming rice bag.
 
I have made rice bags to use as foot warmers before, but I knew just what I should make for her situation. I hopped online and found the perfect tutorial here (even though in all honesty, you really don't need a tutorial or pattern...it is simply a tube of fabric filled with rice and sewn up!)
 
neck roll
neck roll flat
Of course, I did a few things differently, but barely.  I divided mine into 6 sections, and after a little trial and error (because sewing next to a pile of rice is a little tricky) decided that pinning the sections closed horizontally and pushing the rice back toward the newly sewn end as I went was WAY easier than how it is shown in the tutorial.
 
I also pieced both a front and back section and sewed them together rather than folding one wider piece of fabric in half.
 
neck roll folded

The fabric is from my poor baby quilt that is still waiting (rather impatiently) to be quilted and finished. I had cut quite a few extra pieces when I was working on the quilt top, so it was fast and easy to just sew a few of those leftover pieces together to make this.   
 
I love it so much, I think I will eventually make one for myself.
 
Neck roll neck
 
My son loves it too, as you can see.  After modeling it for me, he asked where his was!  I'm thinking a few of these might end up on my Christmas gift-making list this year.

Wednesday, January 16, 2013

#1 WiP 2013 - The One With A Lot of UN-Sewing

It's been awhile since I've Work-in-Progress Wednesday.
 
Here are the things I've been working on:


Monster Hats
for my twins.

Here in Virginia, it is rarely cold enough to wear a heavy coat, so my boys usually just wear the fleece liners, which don't have a hood. So I'm making them these hats to match their jackets for when they go out to play at school. I've got one done, one to go.
 
monster hat


Block of the Month
I decided to do a Block of the Month this year and chose the Sisters Ten Modern BOM over at Gen X Quilters.  I've chosen my fabric and cut it out.  Hopefully I will be able to make them up tonight while my boys are in bed and my husband is at Scouts.

BOM Jan Fabrics


Unpicking a Quilt
I finished this quilt top back in October and thought it would be a quick easy finish and I would have it done in plenty of time to ship to my cousin before her baby was born in early December.  Wow, was I wrong!
 
unpickings

 
I decided to do regular stipple quilting because I was going to use my stitch regulator foot, which I'm really still not totally familiar with.  I thought I would stick to quilting that I can do well without having to focus too much on, so that I could focus more on getting the feel for the stitch regulator.
 
I should have had this little quilt quilted and done within just a few hours, but I ended up fighting with my machine for 3 days before giving up!
 
My thread kept breaking inexplicably every 3-6 inches.  The back of this poor quilt was just a mess of starting knots.  It was awful. 
 
I had tried everything I knew.  Changed the tension, changed the needle, went slower, went faster, changed threads, changed bobbins, you name it, I did it.  Nothing worked!
 
So, after 3 days I gave up, folded the quilt, and shoved it in my closet. 
 
I took my machine in the week before Thanksgiving, but was told it would take up to a month of more to repair.  NO WAY.  So I took it home and just decided I would only be able to sew things with a straight stitch (because for some reason, the thread only broke when I tried anything free-motion), but that was better than nothing.
 
So I was able to make all my Christmas gifts, since none of them required quilting.  But then I pulled out my embroidery module, because we decided to embroider pillowcases for our Primary children this year and I needed to get some done for the January birthdays.  First thing that happened when I tried embroidering - my thread broke!  Arg!
 
That is when I realized that as long as I didn't put the thread through the last hook on the thread guide, it was fine. 
 
So that meant I could finish my quilt!  However, it was at least a third of the way quilted with a meandering stitch.  That is A LOT of unpicking.  But, I just couldn't give it as a gift with all those knots and obvious starts and stops in the back.  So, a few days ago, I finally sat down and began unpicking.  
 
Two nights of unpicking so far, and probably one more night and it will be done.  Then it will be a race to get it quilted and bound so I can get it to it's new owner as quickly as possible...a darling little girl who is already over a month old!
 
And I also signed up to do a BOM at my LQS - an Applique quilt by Edyta Sitar called Spring Bouquet.
 
Spring-BouquetL
 
I am really excited about this.  I think it is beautiful, AND it will give me experience and practice doing applique, as well as working with batiks, which I have never done before. 
 
I've never thought batiks were my style, but I have to admit, I think they are just lovely in this quilt.
 
I was supposed to go pick up my first kit this morning and attend the instructions class, but my son woke up vomiting this morning, so we are all sequestered to the house.  I'm pretty sure I know what I am doing, however, so it shouldn't be too hard to figure out on my own. 
 
Oh!  And another fun thing...I finally got my Christmas present from my parents this past week...a serger!!  I am so excited to get it out and try it out.  I'm sure I will be posting about it when I do. 
 
Linking up to:
 
 
WIP Wednesday at Freshly Pieced

Tuesday, January 8, 2013

A Slow Start and some Dolly Things

I'm a little slow getting things started this New Year.

My sister and her family visited after Christmas through New Year's, and the day they left (New Year's Day) Mr. Pie and I were both slammed by the New Year's Flu that has attacked the East Coast.

Because of that, I am sitting in a chaotic mass of neglected laundry, half-put away Christmas decorations, new year obligations and half finished sewing projects.
 
Really, it's a whole lot of mess around here.
 
Today was the first day I have felt like I have enough energy and gumption to really tackle any of it.  I'm hoping to claw my way out of the chaos by the weekend.  Fingers crossed.
 
In the meantime, however, I thought I would share a few of my Christmas projects.

Bib line up  
 
For 3 of my 4 nieces I made some baby bib and diaper sets. 
 
Bib Set
 
 
Bib stack


Bdiaper stack
 
(The diaper pattern that I used is found here at one of my favorite blogs, Bee in my Bonnet)
 
I ended up making two different sizes of bibs.  I was originally planning on making all the large ones (using this pattern), but once I started putting them together, it seemed the neck hole might be a little small for all dolls.
 
 
Bib sizes
 
So I talked to my sister-in-law (the one who had originally requested the bibs for her daughter) about the sizes of my niece's dolls.  She mentioned that L (my niece) had a cabbage patch baby, and that the neck on the cabbage patch babies did seem to be a little larger.
 
So I searched and searched for some patterns for a cabbage patch baby which, it turns out, are surprisingly hard to find!
 
I did end up finding one here that worked.  I only used the bib pattern, but I pinned the tutorial, which included some basic clothing patterns as well, in case I ever get a request for clothes for this kind of doll again.

I actually ended up liking the small bibs better and wish I had done them all with that pattern!  They turned out so cute and dainty, and looked darling on the dolls.  The bigger pattern ended up looking a little too big to me.
 
I made all but one the sets out of flannel and lined the diapers with white fleece.
 
The only thing I wish I had done differently is narrower top-stitching.  I did about a quarter-inch top-stitch, and while it did catch the hole left for turning, the stitching wasn't close enough to the edge to make the space unnoticeable.  You can see at the bottom of each bib where the turn hole was.
 
Fortunately, these are all for little girls who won't notice or care, but I will do that bit differently if/when I make these again.

Linking here:

 
Fresh Poppy Design
Better Off Thread

Thursday, December 20, 2012

A Little Thing

I made my niece a baby doll quilt (among other things I will post about soon) for Christmas.  I am also making a gift for her mom, my sister. 
 
As I was finishing up my niece's quilt, I decided to use some of the binding scraps and make this little pincushion for my sister as an add-on to her gift.
 
Strawberry Pin CU
 
Strawberry pin
 
I followed the pattern exactly.  It took me about 15 minutes from start to finish.
 
And I love it so much, I am going to make one for myself and one for my other sewing sister :)